目录
可随意转载! Update2022.08.03
前言
pix2pixHD算法是英伟达出品,对前作pix2pix做了改进。从semantic map生成image是多模态图片生成问题,目标是生成高清图,之前论文的算法有两个问题:
- 不能在直觉上控制目标图片生成
- 专注在全局的颜色、材质方面的控制
pix2pixHD算法的目标是做物体级别的控制(instance-level control)。为了做到这一点,训练了netE网络,把低维特征通道输入G,通过操纵这些特征通道来控制生成目标。
来自论文《High-Resolution Image Synthesis and Semantic Manipulation with Conditional GANs》
这篇论文的优点是代码写得非常漂亮,值得一读。
一、数据集预处理
论文使用了cityscapes数据集,是德国多个城市的街景数据(来自Uber租车公司)。论文没有详细展开如何构建训练数据集。本节把论文中没有展开的部分补全:
1.1 cityscapes数据集
下载后原始的目录结果如下:
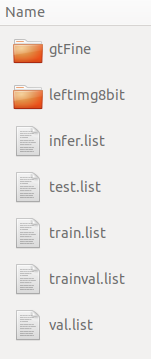
目标数据结构如下:
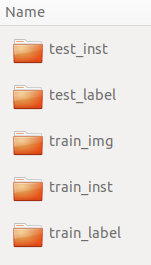
因此需要对原始的cityscapes数据集做转换处理。
1.2转换脚本
只要使用如下自定义脚本就可以完成转换
import os
import shutil

RAW_CITYSCAPES= os.path.join(os.getcwd(), 'dataset' )
TARGET_CITYSCAPES= os.path.join(os.getcwd(), 'target_datasets' )

def make_dirs():
    if not os.path.exists('target_datasets'):
        os.makedirs('target_datasets')
    if not os.path.exists('target_datasets/train_img'):
        os.makedirs('target_datasets/train_img')
    if not os.path.exists('target_datasets/train_inst'):
        os.makedirs('target_datasets/train_inst')
    if not os.path.exists('target_datasets/train_label'):
        os.makedirs('target_datasets/train_label')

make_dirs()
# 从.list索引文件中找到原图、实例分割图、语义分割图对应关系
with open(os.path.join(RAW_CITYSCAPES, 'train.list'), 'r' ) as f:
    for line in f.readlines():
        kv = line.split(' ')
        semantic_map = kv[1].rsplit('_',1)[0] + '_labelIds.png'
        instance_map = kv[1].rsplit('_',1)[0] + '_instanceIds.png'
        # print(kv[0] + '\n' + semantic_map + '\n' + instance_map + '\n')
        # 把几张图全部拷贝过去
        shutil.copyfile(os.path.join(RAW_CITYSCAPES, kv[0]),
            os.path.join(TARGET_CITYSCAPES, 'train_img', os.path.basename(kv[0])))
        shutil.copyfile(os.path.join(RAW_CITYSCAPES, semantic_map),
            os.path.join(TARGET_CITYSCAPES, 'train_label', os.path.basename(semantic_map)))
        shutil.copyfile(os.path.join(RAW_CITYSCAPES, instance_map),
            os.path.join(TARGET_CITYSCAPES, 'train_inst', os.path.basename(instance_map)))
二、安装
从git仓库下载pix2pixHD源码
下载安装pytorch(GPU)
下载安装依赖库:pip install dominate sklearn
三、代码精读
从下面训练代码流程图可以发现,pix2pixHD的论文代码写得很漂亮,模块明确、逻辑清晰。
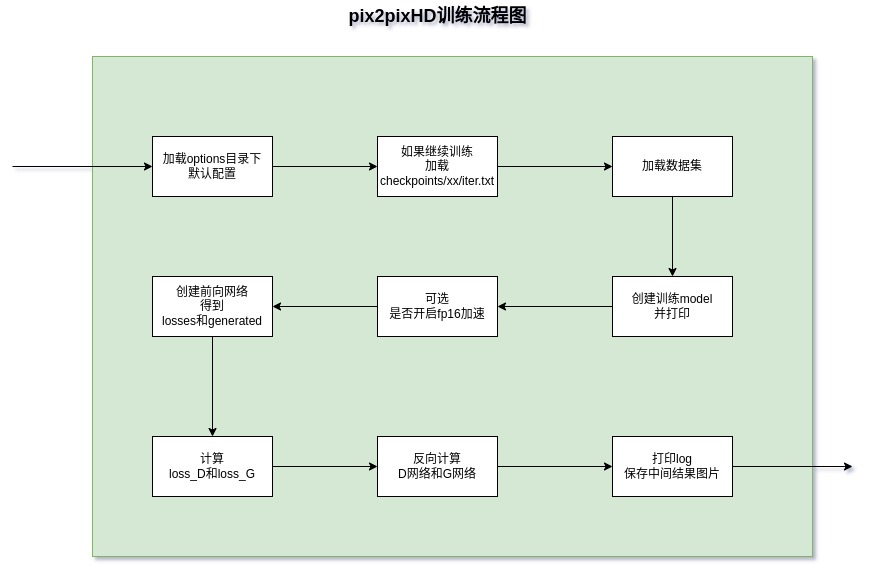
3.1 创建训练model
代码会根据配置参数,选择创建以下三种不同的网络:
- Pix2PixHDModel
- InferenceModel
- UIModel
下面的代码分析都是Pix2PixHDModel相关。因为它就是训练目标。
a) 参数instance_feat
如果配置了这个参数,Pix2PixHDModel网络会有以下不同:
- use_features 为True:G网络的通道数要加上配置参数feat_num的值
- gen_features 为True:训练过程会增加netE网络(encoder),尺寸[1, 3, 512, 1024]。
b) 训练自己的数据集
- 数据中的label map的每个pixel都要有一个通道,并且在训练和测试的时候需要带参数 –label_nc N。数据集一共有34个分类(汽车、行人等)+1个背景分类,one-hot编码后形似:[1, 35, 512, 1024]。简单说就是把图片的RGB通道改称了label map的通道。
- 如果数据中没有label map,请带参数–label_nc 0, 算法默认会用RGB颜色代替,目录也要改称trainA、trainB,效果是从A数据转换成B数据
- 生成器默认输入:label map[1, 35, 1024, 512] + instance map[1, 1, 512, 1024] 连接起来形成[1, 36, 512, 1024],
- 如果只有label语义数据,请使用参数–no_instance
- 默认的裁剪方式是scale_width,如果要修改请设置参数–resize_or_crop
3.2 Pix2PixHDModel精读
a) initialize代码
- 设置训练参数
- 调用networks.define_G(GlobalGenerator网络,define_G请看下面的源码)
- 调用networks.define_D(MultiscaleDiscriminator网络)
- 判断gen_features参数为True(默认False)则调用networks.define_G(Encoder网络)
- 判断是继续训练则加载G,D,E网络参数
- 定义各种loss
def define_G( ... ):
    norm_layer = get_norm_layer(norm_type=norm)
    if netG == 'global':
        netG = GlobalGenerator(input_nc, output_nc, ngf, n_downsample_global, n_blocks_global, norm_layer)
    elif netG == 'local':
        netG = LocalEnhancer(input_nc, output_nc, ngf, n_downsample_global, n_blocks_global,
                                  n_local_enhancers, n_blocks_local, norm_layer)
    elif netG == 'encoder':
        netG = Encoder(input_nc, output_nc, ngf, n_downsample_global, norm_layer)
    else:
        raise('generator not implemented!')
模型中原始的损失函数:
- loss_D_fake
- loss_D_real
- loss_G_GAN
- loss_G_GAN_Feat
- loss_G_VGG
train函数的loss计算:
- loss_D = D_fake的loss + 0.5的D_real的loss
- loss_G = G_GAN的loss + G_GAN_Feat的loss + G_VGG的loss
b) encode_input函数精读
- 创建label map的one-hot(尺寸[1, 35, 512, 1024]),采用torch.scatter_填充并取名input_label
- 创建instance map(尺寸[1, 1, 512, 1024])
- 通过方法get_edges获取(尺寸[1, 1, 512, 1024])
- 把input_label和edge map连接,得到新的input_label,尺寸[1, 36, 512, 1024]
c) forward精读
- 调用encode_input
- 根据use_features值,训练netE网络返回feat_map([1, 3, 512, 1024])
- 把input_label([1, 36, 512, 1024])和feat_map连接,组成input_concat(尺寸[1, 39, 512, 1024])输入G网络
- 计算五个loss,输入input_lable(注意不是input_concat)到D网络三次。
3.3 netE精读
在Encoder网络的forward方法最后增加了一层物体级别的平均池化(instance-wise average pooling),如下图:
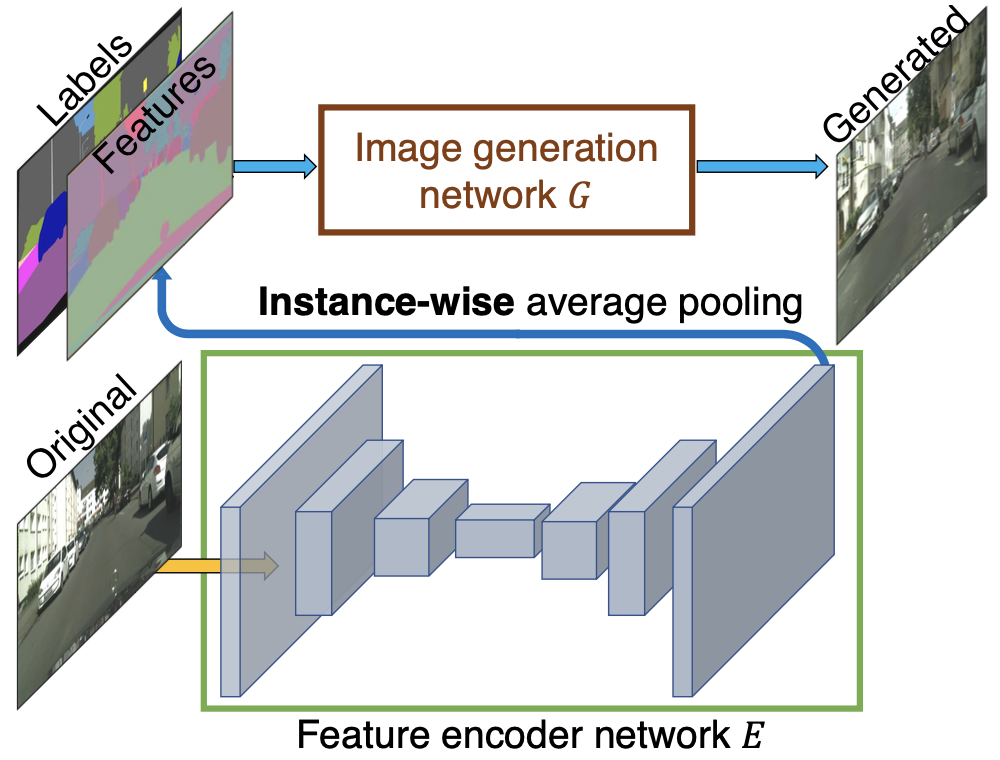
    def forward(self, input, inst):
        outputs = self.model(input)

        # instance-wise average pooling
        outputs_mean = outputs.clone()
        inst_list = np.unique(inst.cpu().numpy().astype(int))
        for i in inst_list:
            for b in range(input.size()[0]):
                indices = (inst[b:b+1] == int(i)).nonzero() # n x 4
                for j in range(self.output_nc):
                    output_ins = outputs[indices[:,0] + b, indices[:,1] + j, indices[:,2], indices[:,3]]
                    mean_feat = torch.mean(output_ins).expand_as(output_ins)
                    outputs_mean[indices[:,0] + b, indices[:,1] + j, indices[:,2], indices[:,3]] = mean_feat
        return outputs_mean
3.4 encode_features.py精读
在scripts目录下运行带有_feat的脚本,它里面包含了encode_features.py,它的作用是:
- 先调用pix2pixHDModel类中的encode_features函数,从netE中生成feat数组,获取训练数据的所有特征。
- 用sklearn中的KMeans把这些feat分类,每一个分类就是一个可控特征。
# 结果:
# 未聚合的features map数据
# 聚合后的features map数据
features.npy
features_clustered_010.npy
3.5 precompute_feature_maps.py精读
这个脚本功能跟上面 3.3 类似,它除了调用了netE生成feat数组,还使用了上采样2倍(Upsample X2)。这样就得到了高分辨率下的语义图。
# 结果:
datasets/cityscapes/train_feat目录下所有语义图片
分辨率提升
算法中的G函数有两个,一个是global的,一个是local的,在训练前面的算法的时候local的G是不会被调用的。
需要开启如下配置:
{
    "version": "0.2.0",
    "configurations": [
        {
            "name": "Python: Current File",
            "type": "python",
            "request": "launch",
            "program": "${file}",
            "console": "integratedTerminal",
            "justMyCode": true,
            "args": [
                // train high resolution
                "--name", "label2city_1024p_feat",
                "--netG", "local",
                "--ngf", "32",
                "--num_D", "3",
                "--load_pretrain", "checkpoints/label2city_512p_feat/",
                "--niter", "50",
                "--niter_decay", "50",
                "--niter_fix_global", "10",
                "--resize_or_crop", "none",
                "--instance_feat",
                "--load_features",
            ]
        }
    ]
}
这个训练方式的目的是为了训练1024*2048的超高分辨率图片,其中用到了 3.4 生成的1024*2048的语义图。也就是说G网络的global和local不是同时使用的,千万别弄错了。